Awhile back we did some on camera shooting of the EnGarde Body Armor Level III and IV Plates, we were new to doing reviews at the time and learned a lot. Well now we have the opportunity to run another test on a body armor plate thanks to Infidel Body Armor, they sent us one of their 10x12 Plates to use for test and eval.
The last time we did a body armor test we set the plates against a back stop, while that did give us a good idea of what the trauma would be like behind the plate we really couldn't see just how much. This time we are planning on setting blocks of clay behind the plate so we can get a good idea of just how much force is transferred rearward. We will also be checking for spalling since this plate is made of 1/4" AR500 steel with an anti spalling material layered over it.
Just some quick facts about the Infidel Body Armor plates, they are as stated above made from 1/4" AR500 steel and lined with 1/4" of anti spalling material. They are curved so they fit comfortably against the body, and the angled cut makes it easy to shoulder your rifle without setting it on the plate. Each plate weighs a little under 9 pounds, and is rated as a Level III Stand Alone plate.
We are really looking forward to getting some testing time with this plate and are excited to relay the information back to you our viewers. Make sure to check back for the written review and the video soon.
Find reviews on guns, accessories, survival equipment, and other cool items. Thanks for checking us out!
Showing posts with label Reviews. Show all posts
Sunday, August 25, 2013
Quick Look: Infidel Body Armor
Labels:
AK,
AK-47,
AK47,
AR,
AR-15,
AR15,
Armor Plates,
Body Armor,
Carrier,
firearms,
Infidel Body Armor,
Level III,
Plate Carrier,
Plates,
protection,
Review,
Reviews,
Rifle,
tactical
Quick Look: Kaw Valley Precision Linear Comp
Since we here at SpartanTC Reviews have been checking out so many different compensators over the past couple months we figured we would get our hands on a couple more to try out. Recently we contacted Kaw Valley Precision about their Linear Compensator, it was one that a few of you had asked about it, and I had actually seen it a few times while browsing around the internet. KVP was awesomely quick to get back with us and help get our hands on one to test out.
(The new SpartanTC Reviews AR outfitted with the Kaw Valley Precision Linear Comp)
For those who do not know what a linear compensator is here is an answer taken directly from KVP's website.
What is a Linear Compensator?
A linear compensator is a muzzle device designed to collect and direct all the muzzle gases forward, away from the shooter. Unlike other types of muzzle devices, KVP linear comps actually lower the decibel the shooter experiences while shooting the rifle. This lowered perceived decibel is especially noticeable in shorter barreled rifles while shooting high power rounds.
When you first pick up the KVP Linear Comp you can tell right away that it is a solid piece of work, and won't be damaged easily. The machining is really clean on it, and the finish is really well done and seems like it will stand up to quite a bit of abuse.
If you take a close look at the KVP Linear Comp you will notice that the only holes that it has are pointing forward. While this gives it a very different look I am really looking forward to taking it out to the range and seeing how much "quieter" it is over the other comps we have used.
We are hoping to get the new SpartanTC Reviews Test AR out to the range very soon and get some video, along with our initial thoughts on shooting with this comp. Make sure to stay to keep checking back as there are lots of reviews in the works!
Friday, August 23, 2013
Strike Industries J-Comp
I recently had the opportunity to take the Strike Industries J-Comp out to the range and get some shooting in with it. I decided I would write down some of my initial thoughts on it before we head out to the range to do some more shooting with it.
As you can see in the picture above the overall length of the SI J-Comp is slightly longer than the other two muzzle devices, however when it's installed it doesn't look awkward like some other comps I have used before.
One of the first things that you notice about it is the interesting design. It was designed after the Japanese Type 89 Assault Rifle muzzle device, so it is a unique comp to say the least.
The rear two ports are meant to reduce recoil and redirect the concussive force you get from a typical compensator, and the front ports are meant to reduce muzzle flash. This means that it should be the best of both worlds when it comes to reducing recoil while still aiding with hiding the flash.
The reduction in the concussive force from my experience is not as good as some of the more expensive comps (such as the Lantac Dragon) but at the price point of $39.99 it does a decent job. It does create a dust signature to the sides of the muzzle when shooting prone but the amount of dust created isn't all that bad.
As far as reducing muzzle rise goes the J-Comp does a fair job, while I haven't tried shooting rapidly with it yet the comp does a pretty good job of controlling muzzle rise and allows you to get back on target quickly.
So far with the limited time I have spent with it I am not completely sold on it to the point that I would install it on all of my rifles. It is however well priced and a very well machined compensator, which does what it is advertised to do. Hopefully I will get the opportunity soon to take it out for some night shooting and we can see how well it hides the flash.
Make sure to check back for updates in the near future.
Labels:
AR,
AR-15,
AR15,
firearms,
IGmilitia,
modifications,
Review,
Reviews,
Rifle,
shooting,
Strike Industries,
tactical
Thursday, August 22, 2013
ThinkFast Holsters IWB and Mag Pouch
Around a month ago I received my IWB holster and Double Mag Pouch from ThinkFast Holsters. With as often as I go through guns I had decided to hold off on ordering one for the Glock 19 until I was sure it was going to stick around. I have dealt with several different Kydex holster makers over the past year and a half, so I know what I like and what I don't like.
The IWB holster and the Double Mag Pouch from ThinkFast are both great quality works of Kydex and there is a great deal of pride that is put into making them.
The IWB holster is comfortable in the appendix position for an extended period of time, even during the 16 hours I wore it during Combat Focus Shooting last weekend. With the sweat guard being a lower cut than some of the other in waistband holsters I have had, I've noticed that it doesn't poke me in the spare tire and make me wish I had worn on OWB holster instead. At the same time the sweat guard is still tall enough to help keep my undershirt from being caught between the gun and the holster (not 100% of the time though).
As you can see in the top 2 pictures the mounting hardware for the loops has been set back and away to keep from doing any damage to your gun while drawing or holstering. This is a feature that I appreciate since my Glock is "fancy".
The soft loops are now my favorite type of loops for an IWB holster, j-hooks are nice but I like the way the soft loops completely lock around the belt versus just sitting behind and under like j-hooks.
.
ThinkFast does a great job of making sure that all edges that come in contact with your body have been smoothed and rounded. When carrying appendix style I don't feel the holster jabbing me in my leg, which is a big plus
The double mag pouch is also very well made, it sits closely to the body making it easy to conceal. Having the center screw for adjusting the amount of retention is a nice touch, I have other mag pouches that do not have this and the mags tend to stick in them since they are a bit of a tight fit.
The loops on the mag pouch are awesome! They are injection molded and are solid. I've snagged the holster a couple times on doorways and such and felt the holster give a good tug on my belt, where other pouches with Kydex formed into loops possibly would have broken.
One thing I have noticed however is that the screws have loosened up a couple times, it's not a big issue as I expected there would always be some small maintenance that would need to be done to any holster that uses screws for mounting.
Overall the mag pouch and IWB holsters are great, I'm sure they will both give me a long life of service. Also an added plus is that the customer service with ThinkFast Holsters is great, and they are quick to answer any questions you may have.
I highly suggest if your looking for a great holster to take a look at what ThinkFast has to offer.
Friday, August 9, 2013
EPLowers Polymer Lower
A few weeks ago I had talked with Chris from www.EPLowers.com about the 80% polymer lowers that they are producing, he was really informative and helpful. He was awesome enough to engrave the SpartanTC81 logo into the lower, which made this already cool project even better in my eyes.
The reason that the EP Lowers can be finished using a Dremel and a drill, is that the firing control group pocket contains a white polymer. The idea behind it is to remove all of the white polymer from inside the pocket until you get to the solid black (or whichever color your lower is). Once you get to the solid color you will still have to remove some of the colored polymer to allow for the proper fit of the firing control group.
In the picture above you can see a good majority of the white polymer has been removed. Notice the black "bars" that are on the sides, these help you gauge where you are at while using the Dremel to remove the white polymer. They do disappear when you are close to the bottom and at that point it is important to take your time and watch for the final layer of white polymer to give way to the colored polymer below.
Above you can see that there are a lot of shavings from removing the white polymer. If you have access to a shop vac I highly suggest rigging it so that it will aide in the removal of the shavings while you are working.
As you get further down and the walls of the white polymer become thinner you can actually use a set of pliers to remove it.
When drilling the holes for the trigger and hammer pins I highly suggest drilling straight through from one side to the other. The directions on EP Lowers site say to do them one side at a time, which I did and because I was doing it by hand the drill walked and ended up miss drilling the holes (this was my fault). I ended up with the left side holes sitting lower than the right side, and this lead to the hammer being off center, which lead to the trigger not releasing it.
Also my selector hole was off, it still worked but was extremely stiff due to it being angled.
As for the quality of the lower, I cannot speak on the durability of it yet since I haven't had the opportunity to toss an upper on it and run it to the range; but it does have a solid feel. It has very little give compared to some of the other polymer lowers I have messed with before and the polymer has a nice feel to it. The "finish" of the polymer is clean and some people who have seen the pictures of the lower have actually mistaken it for a billet lower.
Once I have a few hundred rounds on it at the range I will be writing a follow up post along with some videos of it performing at the range. I have no doubt that it will work just fine and will be a great range rifle.
Overall this was an awesome learning experience, it gave me a whole new appreciation for building a lower. If you like to tinker on your own firearms and are looking for a new project head on over to www.EPLowers.com and check out what they have to offer.
Thursday, August 8, 2013
Strike Industries AK TRAX Rail System
I am sure that many of you have seen the video on the Strike Industries AK TRAX hand guard that I posted earlier in the week, for those of you who haven't I have imbedded it below.
I have been extremely happy with this hand guard so far, but then again the standard Saiga hand guard leaves you with absolutely no mounting options and honestly it looks just a bit weird since they "sporterized" it. So having the option to put a hand guard on that has quite a few different ways to mount rails is pretty awesome.
There are quite a few things to like about the AK TRAX, from the key mod rail system to the multiple mounting options for the hand guard itself. The overall quality is really good, there aren't any rough or sharp "unfinished" spots to be found, and the finish is also great quality.
So far I have had it on my AK for around 2 months and have used it on the range quite a few times, I figure it has been on for around 1,000 rounds so far. Like I mentioned in the video I did have an issue with the front mounting screws falling out because I didn't loctite them in place, but that was an easy fix thanks to the awesome customer service over at SI. Other than the one hiccup with losing the small screws there have been absolutely no other issues with this hand guard, the key mod rails mount nice and snug to it and do not loosen up during use; it has been great having the ability to run a flashlight and the gopro on the rifle.
If you are looking for a good hand guard to install onto your AK I would highly suggest taking a look at the info at www.StrikeIndustries.com.
I will be posting follow up reviews as time goes on so make sure to check back!
Friday, August 2, 2013
Lantac Dragon Compensator
Lantac USA recently announced the release of their Dragon Compensator for 5.56/.223 with plans to release a 30Cal version in the near future. They have done a great deal of hyping for the release of the 5.56 Dragon comp, so the question in my mind was "does it meet all of the hype?", and of course the only way to find out was to get my hands on one and take it out for some range time.
SPECIFICATION:
Caliber: 5.56X45mm / .223
Material: Super Hard Milspec Steel
Finish: Nitride QPQ
Dimensions: L: 2.570'', DIA: .870''
Weight: 3.2oz
Thread: 1/2-28 UNEF R/H
Serial Numbered for Quality Control
Made in the USA.
When you first catch sight of this compensator you immediately see a resemblance to the muzzle device of an AK-74, with the 4 top ports and the 3 sleek open ports on either side of it. It is one extremely nice looking compensator that just seems to scream that not only does it look good but it will perform just as nicely as it looks.
As soon as it was installed on the S&W M&P AR-15 the range began to call out to it, and once it was out on the range it answered that call.
Out of the handful of different compensators I have shot with over the past couple of years my biggest complaint was that each one of them when being used under the range cover rattled my brains and made my sinuses hurt. However this was not the case with the Lantac Dragon, instead of forcing the majority of the concussive force upwards in an effort to keep the muzzle down the majority of the concussive force was pushed foward and away from the shooter. This resulted in a much more pleasant shooting experience when under the range cover.
Now even though the majority of the force is pushed out the sides and forward, it doesn't mean that the compensator was not effective at doing its job of keeping the muzzle from rising. Instead this was one of the flattest shooting compensators I have used, there was literally no muzzle rise after each shot; and to top it off the amount of felt recoil was also reduced. Pair the lack of muzzle rise with the reduced feel of recoil and you have the ability to quickly aquire your target.
At 100 yards using a Lucid Red Dot I was able to continually smack the 10" metal gong, and double taps were amazingly easy to control and still ring the gong. It brought a sense of controllability I have been looking for when it comes to using an AR and firing quickly.
Overall I was extremely impressed with the performance of the Dragon Compensator and cannot wait to get my hands on one for each of the AR builds that I am currently working on.
If you have been looking for a great compensator to slap onto your AR, this is one that I highly suggest you look into.
You can preorder one through Harris Tactical using the following link.
Saturday, June 29, 2013
Iron Hammer Armory .300 Blackout Upper Review
A couple months back I started talking with Iron Hammer Armory about the AK's that they have been producing and also the line of AR's that they have been working on putting out. There have been a lot of conversations between Martin and myself and I have come to really appreciate the information that I get from him whenever I ask questions. So when I was asked if I would be up for testing and reviewing the IHA .300BLK complete upper I told them heck yes, I would love to get my hands on any AR upper to take out and test anytime I can.
When I picked up the upper from a friend's shop I was really impressed with the way that it looked, with the Stainless Steel Barrel coming out from under a black hand guard it has such a cool look to it. What I thought was really awesome was that the Hand Guard was from ODIN Works which is another company whose products I have heard great things about and had hoped at some point I would get to check out in person.
While I personally prefer a longer hand guard on my AR uppers the 9.5" that the IHA is outfitted with does give it a very clean look since it allows the SS barrel to really stand out. I took some time to field strip the upper and give it a good cleaning and applied FIREClean to it like I do with all of my other firearms (yes even when I do testing for companies I still give it a good clean before and after shooting), this gave me the chance to check out the workmanship that has gone into the building of this upper.
First thing that I noticed was that there was not a single blemish to be found inside and out, and the BCG was staked correctly and everything fit together really well. It was very noticeable that there was great pride taken in assembling the upper. The laser etching on the receiver and the charging handle is a very nice touch and adds some character to the overall build also.
The ODIN Works hand guard is very sleek and very comfortable to hold since it is smooth on the sides with one small section of rail on the bottom side at the front. The rail matches up perfectly with the receiver and gives it a nice continuous look. The overall construction of the ODIN Works hand guard is really good, while being lightweight it did not feel cheap or flimsy like it could break at any second. Just from the short amount of time that I have had with it I have decided I will be using one of their longer hand guards on one of my future builds.
When I was able to take the upper out to the range it was both too windy and too busy for me to be able to setup the cameras to capture any good videos of me firing it, there was also the issue of the wind blowing down the target stand that I was trying to use to zero it in. So finally I gave up and just aimed for the steel plate that we had setup down range. Even though the scope I was using was garbage I was able to figure out where to place the reticle to ring the steel, and once that was figured out I can tell you the steel just kept ringing.
Every shot that I was sending down range was hitting it's intended spot, and even though I did not have a paper target to measure exactly how accurate this upper is, the side by side and stacked marks on the steel were enough for me to consider this an accurate barrel and with a properly sighted scope and a worked up hand load it should be hitting Sub MOA (I am not an expert marksman but I have shot both well made and crappy made barrels and this is well made).
While the price for the upper is still up in the air until IHA is able to get the production of them moving I will say that it is a very nice upper with some very nice features, I am sure that the price will contend with many of the other companies that are building uppers, and even if it is a little higher the quality and craftsmanship that is put into it shows. Below you will find a graphic that has the breakdown of the parts used for this upper, all of the parts are nice quality parts that should give you a long happy service life from it.
I would like to thank Martin at Iron Hammer Armory for allowing me the opportunity to take this upper out to the range and check it out, this was the first time that I have been able to test a new product for a company before it's release and I am hoping that I will get the opportunity to do that more often.
Labels:
.300BLK,
AR,
AR-15,
AR15,
blackout,
firearms,
Hand Guard,
Handguard,
IGmilitia,
Iron Hammer Armory,
modifications,
Review,
Reviews,
Rifle,
shooting,
tactical
Tuesday, February 5, 2013
Kies Adjustable Gas Block
There were quite a few different gas blocks that I had looked at when I started ordering parts for the Spartan build. I had decided that this build I wanted to do an adjustable gas block so I could really fine tune the rifle, and if sometime in the future I picked up a suppressor I would be able to adjust the settings to make the rifle function properly.
The Kies Firearms Adjustable Gas Block caught my eye when I was browsing through the parts section on Joe Bob Outfitters, it was in the price range that I was looking to spend and it had some pretty decent reviews on it. Oh and for those of you who have done gas rails before and hate the roll pin as much as I do, the Kies gas block uses an allen screw in it's place.
Being that I was using the the Midwest Industries Gen-2 SS hand guard I knew that the inner diameter was smaller than the normal hand guards that are out there and I was a little concerned that the two pieces wouldn't work together. So I contacted Joe Bob Outfitters and asked if they knew if the two would be compatible, and as always I received a quick response with a for sure answer that they would and I was good to go with my order.
When the package arrived 2 days later (I have always appreciated Joe Bob's quick shipping!) I pulled out all of the individual parts that I had ordered and checked them over to make sure that everything was there and nothing was damaged. When I came to the Kies gas block I checked it over really well and was very impressed with the quality and finish of it, especially for the lower end price tag that it had on it.
Installing it onto to my Rainier barrel was really easy, unlike some other blocks I have used in the past this one did not require any tapping with the brass hammer to get it into place. Another thing that I really liked about it was the allen set screw that was included to be used in place of the roll pin, let me tell you all this now, it is one of the smallest set screws I have ever messed with so be careful not to lose it if you get this gas block. Running the set screw in was probably one of the easiest things I did on this entire build, and once it's in it is not coming out. My Rainier barrel has a divot for where the set screw should set for the gas block, which made it very easy to get it into position and properly secured.
The first time I took the rifle out to the range I had to make the initial adjustment to the gas block, and the only problem I had was that the set screw for adjustments was behind my hand guard and there is no way to adjust it without removing the hand guard. Not really that big of a deal with as easy as the hand guard is to remove.
The first shot that I took the set screw was all the way in, the rifle fired but did not cycle which was expected. I backed the set screw out a turn and fired, the bolt cycled but only part of the way and did not lock back on the empty magazine. Again I made an adjustment but this time I took it out 3 turns, which was too much and slapped the bolt forward. At this point I was trying to figure out exactly how many turns I needed to go in, so I bottomed it out again and took it out 2 and a quarter turn, this was the ticket, everything functioned as advertised except for the ejector (which I discussed in the RGuns BCG post).
Since the first trip out I have run somewhere around 400 rounds down range with the rifle and have not had a single hiccup out of it. All of the set screws for the Kies Gas Block are still tight and in position, and I am looking forward to seeing how much abuse I can actually put this block through once ammo becomes available and affordable again.
If you are looking for a budget adjustable gas block make sure to add the Kies gas block to your list, I am happy with it so far and I will definitely use one on the .300 Blackout build I plan to do in the future.
Sunday, February 3, 2013
15" Midwest Gen-2 SS Free Float Hand Guard
When I started searching around and looking for that "perfect" hand guard to put on my first ground up build I had a few things in mind. First I knew that I was going to be putting a 14.5" barrel onto the build, and I knew that I would want to cover as much of that barrel as I possibly could with the hand guard. There were plenty of companies out there with 15" hand guards, and quite a few caught my eye, but not nearly as much as the 
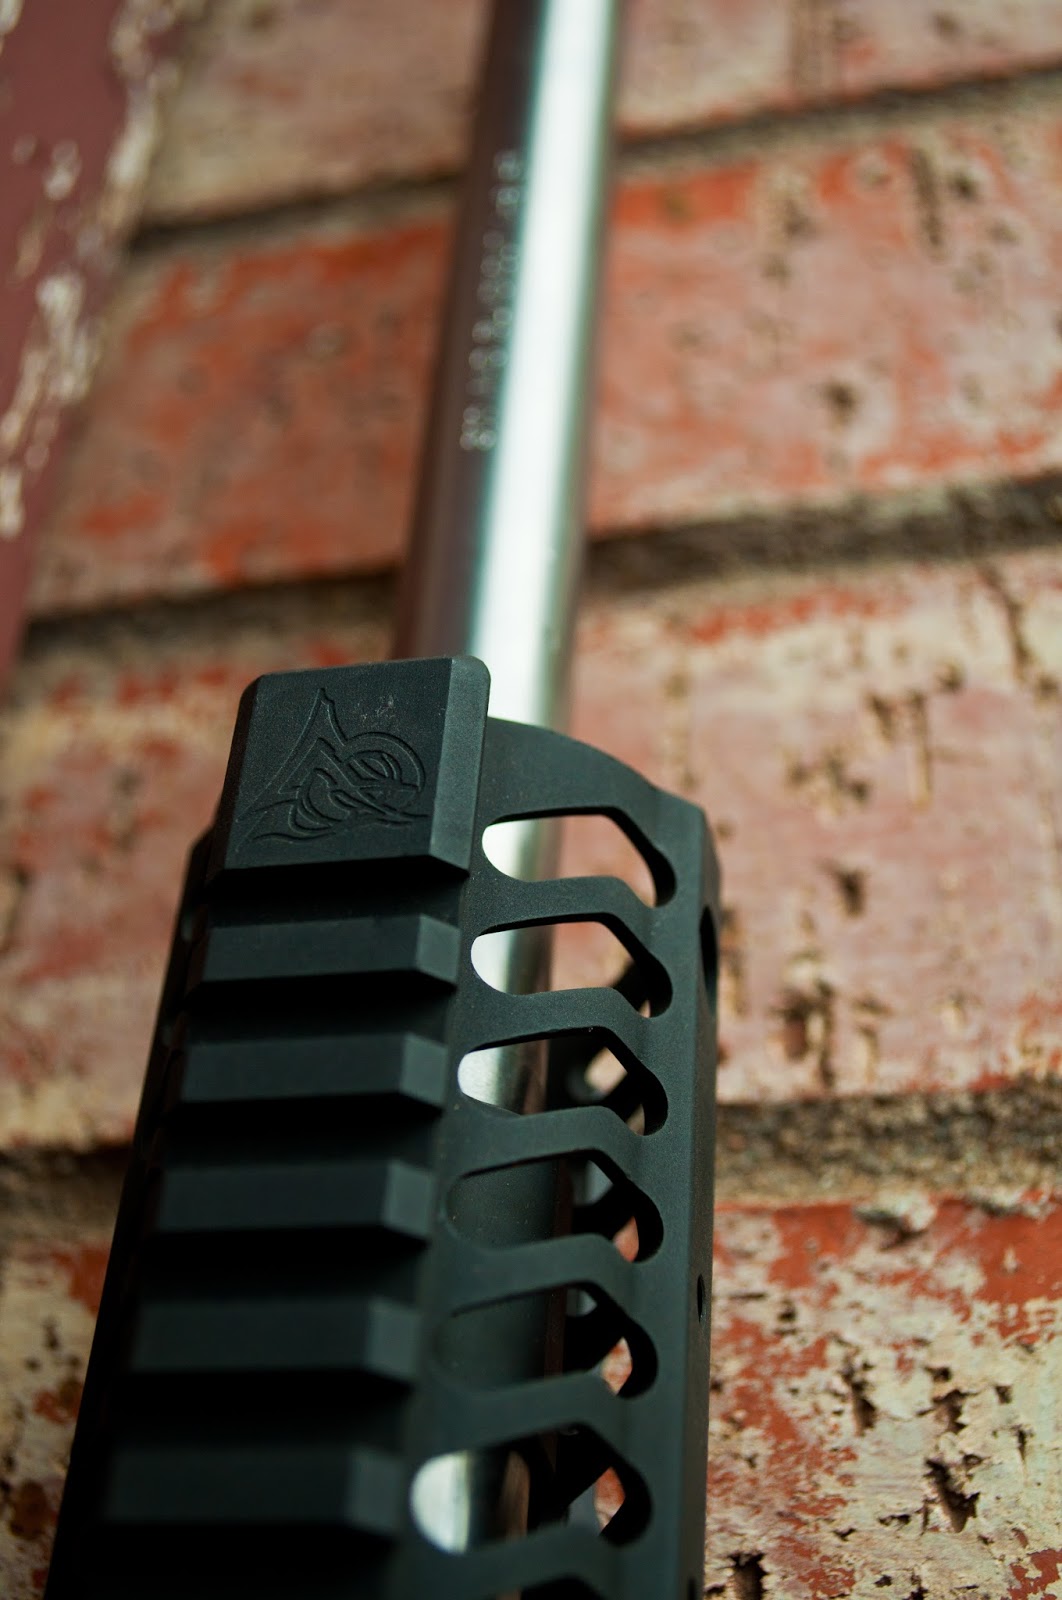
Midwest Industries Gen-2 SS Series Free Float Hand Guard. When I first saw it I was immediately drawn to the fact that it is very sleek and simple, there isn't all the mess that you get with the typical railed hand guards. I knew as soon as I saw this one it was what I wanted to put on the build.
Now finding it was actually a lot easier at the time, we hadn't come into this crazy period of everything being sold out with unknown times of when we will ever see them again. It just so happened that a friend of mine who has his own business, came across one that a supplier had and he let me know what his price on it was and if I wanted it I could get it. Needless to say I quickly jumped on the opportunity and had him pick it up. When I met with him to pick up the hand guard I was surprised at how light weight it actually was, weighing in at 10.9 ounces it is very light for such a long hand guard.
Once I finally had all of the parts to build the upper I did a quick browse around the forums, google, and youtube to see if anyone had any issues with putting this on their builds. Quickly I found out that this was a very simple and straight forward design to install (much easier than most free floats out there), I needed to use supplied barrel nut and get the holes lined up for the gas tube, then simply just slide the hand guard into place and tighten the two set screws, it was as simple as that and I loved it.
Functionality:
This is a great hand guard, as I have said before it is a super simple design and if you want to keep you rifle on the light side this is a great way to do it. Even though there are not rails on the sides or bottom of the hand guard there are pre drilled holes where you can put "floating" rail sections on (3 with screws are included in the original box). Having the ability to move and remove the rail sections is really convenient, because it gives you the ability to add accessories to your rifle, without the excess weight that you would have with a full rail system.
With the hand guard being as slim as it is, I have found it very easy to wrap my hand around and get thumb over bore positioning without feeling uncomfortable.
Looks:
What can I say, I really like the way that it looks, I think it is very sleek looking. It has a very small profile when installed, actually slim enough that I have been asked if the Rainier barrel is a bull barrel because the hand guard doesn't have all of the typical bulk.
Finish:
As with every other part that I have used from Midwest Industries the finish on the hand guard is top notch. When I took it out of the packaging I looked it over really well to see if there were any imperfections in the material or finish and I was unable to find any. Any edges that could have possibly been sharp have been smoothed out.
Overall I am completely happy with this hand guard, it truly fit the bill of what I was looking for, and the more that I use the rifle with it installed the more I like it. As I said earlier everything I have bought from Midwest Industries has been awesome quality and the attention to detail that they give their products is evident.
I will fully recommend the Midwest Gen-2 SS Free Float Hand Guard series to anyone who is looking for a nice lightweight hand guard, but it still wanting the ability to add rails for accessories.
Subscribe to:
Posts (Atom)