I met Marshall a few months back through the Oklahoma Shooters Association Forum when I was in the process of looking for a Glock Armorer to work on my newly purchased G19. After talking with him back and forth through private messaging I decided he knew more than enough to trust working on my firearms.
I had him install sights, and rework the trigger to be smoother and lighter than it was stock. Let me say this much, the work that Argyle Armoring completes is top notch, everything comes back to clean and in top working shape.
The trigger mods that he completed made it pull so much easier and with a crisp break, and the reset was much shorter making it easier to put another round down range quickly.
Overall I would highly suggest anyone looking for a good Glock Armorer to check out www.ArgyleArmoring.com and make sure to let him know SpartanTC81 sent you his way.
Thursday, December 13, 2012
First Impressions of the FNH FNS-9
Out of the multiple handguns that I have owned since moving to Oklahoma in 2010 it has taken me awhile to find something that I like as much as the first gun I ever purchased, which was a Sig Sauer P226. It is like I have heard said many times, there is just something about a Sig.
In the long list of guns that I have owned since I sold the P226 there have been Glock's, M&P's, a Shield, Bodyguard, and a few others, all of which have either been traded or sold in pursuing something I like better. I still own my M&P9 that has the Apex Trigger upgrade done to it and I love using it at the range, but at the same time do not like using it as a concealed carry pistol because of the trigger upgrade.
I was at my usual gun shop one day and they had an FNH FNS-9 that someone had traded in, and I had heard a few things about the FNS but had not seen one in person yet, so I figured I would give it a closer look. When they handed it to me in the shop I was quite impressed with the way that it felt in my hands, I also felt like it pointed very naturally for me. Needless to say I found myself wanting one, but not wanting to buy someone else's problems I opted to have the shop order me one that was brand new.
After waiting a couple weeks for the gun to arrive at the shop I finally was able to pick it up, but because the gun shop that I use is in Oklahoma City which is an hour and a half away I had to wait a couple days to be able to take it out to the range. So I did like I do with every other firearm I bring home, I field stripped it and cleaned off all of the factory oil and got it ready to be warmed up and apply Frog Lube to it.

Tear down is very similar to the S&W M&P's, with just one little trick that took me a second to figure out, and that was when you move the slide forward you need to put your thumb on the back and give it just a little more push to get it over the detent for the safety. Which is actually nice if your hand accidentally slips in the process your slide won't jolt forward.
After I finished applying the Frog Lube paste and letting it dry to the point that I could rub off the excess it was ready to go to the range the next day. Having very little time to spend at the range I only took 50 rounds with me so I could get a feel for how the FNS shoots and what I was going to have to do to get used to using the european sighting (actually putting your front sight on what you want to hit).
Along with the FNS I took our M&P9 that has the Apex trigger kit installed so I could compare the two. I also took my wife with since she enjoys shooting and I also like to make sure that she is familiar with every weapon that is in our house.

I must admit that the stock trigger on a brand new FNS9 is a bit more stiff than one that is pre-owned but I know that over time the trigger will wear in and be closer to that of the pre owned one I had messed with at the store. Yet running through a quick session with it I did not feel that the trigger was bad at all, actually it was much better than the stock one that had been in the M&P, the reset is very pronounced and the pull is not super long.
I should also point out that the mags are very slick and drop freely with out any hang ups.
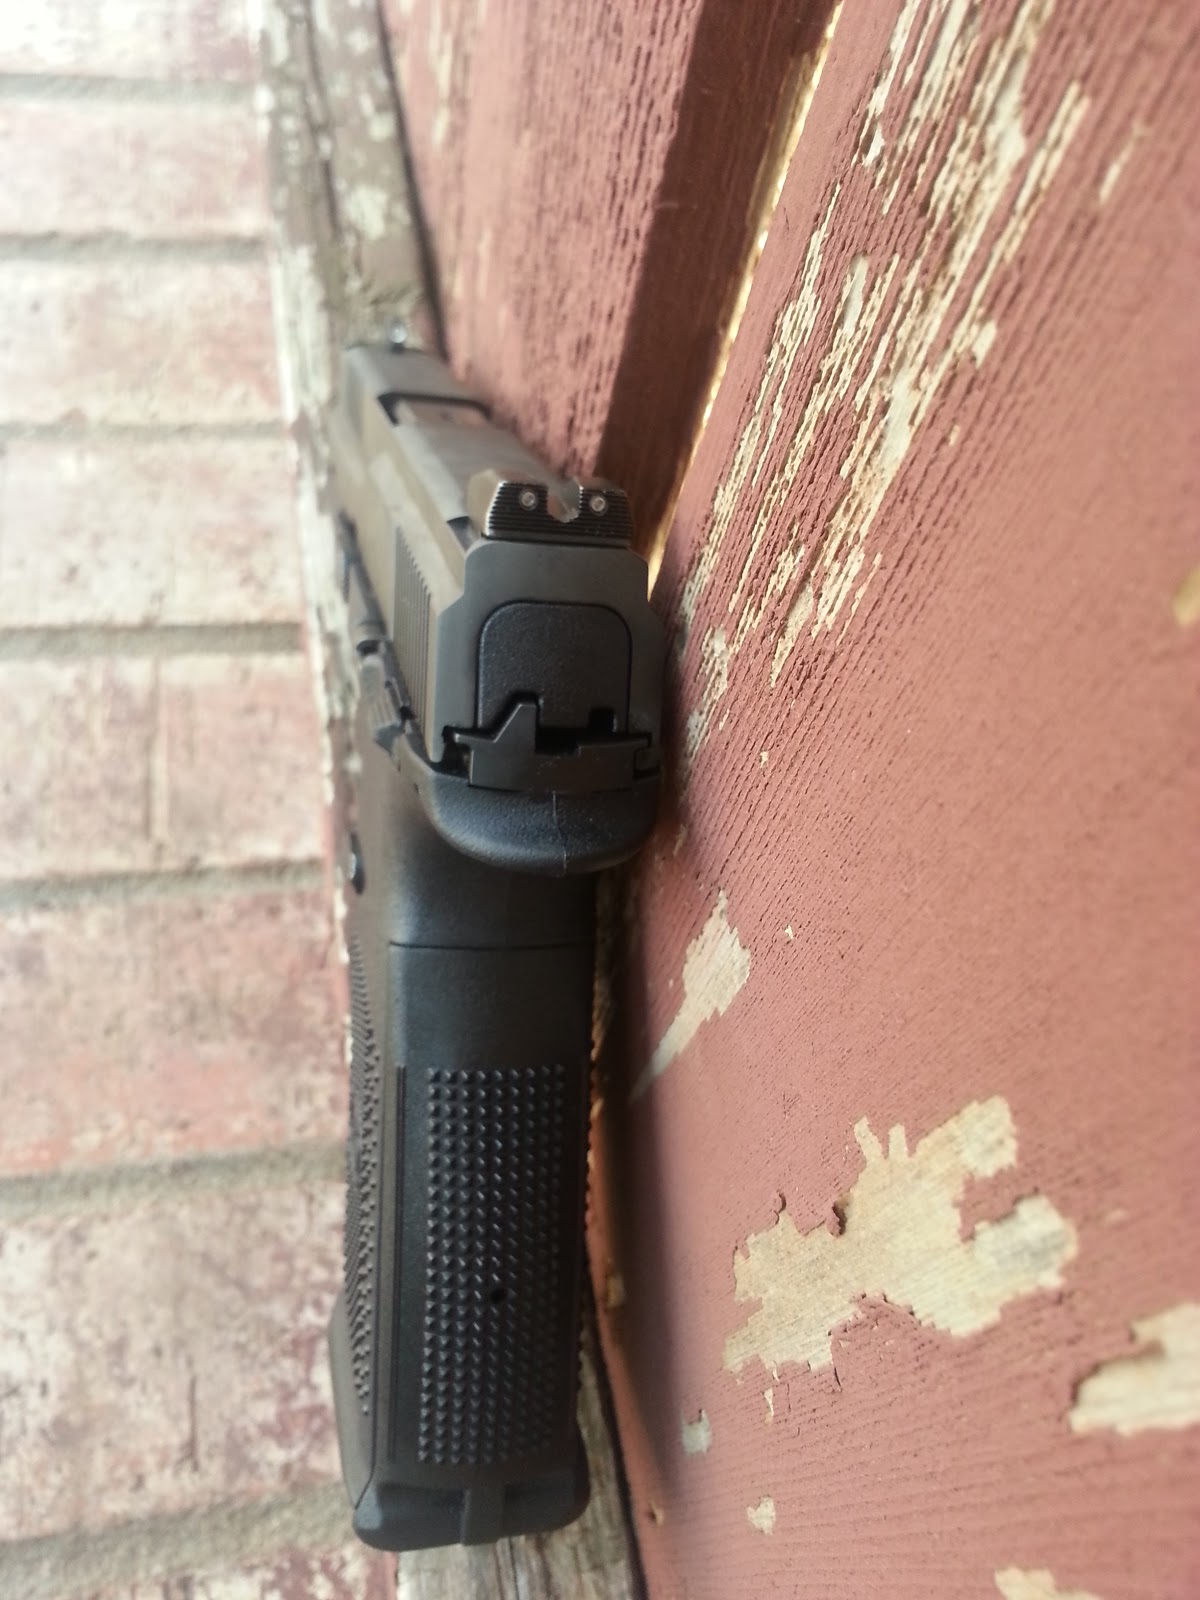
The night sights that are installed on the FNS are very nice quality, and are very easy to use in full light and low light environments. It does take a little getting used to using european sighting but for me I have always had an easier time with that style anyways.


Overall I really like the FNS9 so far, and I am sure as time goes on and I get more range time with it that I will like it even more. I am glad that even though it is a bigger handgun in size that I can still conceal it for everyday carry and it is still comfortable at the end of the day. I plan on giving updates as time goes on and more rounds have been run through it.
In the long list of guns that I have owned since I sold the P226 there have been Glock's, M&P's, a Shield, Bodyguard, and a few others, all of which have either been traded or sold in pursuing something I like better. I still own my M&P9 that has the Apex Trigger upgrade done to it and I love using it at the range, but at the same time do not like using it as a concealed carry pistol because of the trigger upgrade.
I was at my usual gun shop one day and they had an FNH FNS-9 that someone had traded in, and I had heard a few things about the FNS but had not seen one in person yet, so I figured I would give it a closer look. When they handed it to me in the shop I was quite impressed with the way that it felt in my hands, I also felt like it pointed very naturally for me. Needless to say I found myself wanting one, but not wanting to buy someone else's problems I opted to have the shop order me one that was brand new.
After waiting a couple weeks for the gun to arrive at the shop I finally was able to pick it up, but because the gun shop that I use is in Oklahoma City which is an hour and a half away I had to wait a couple days to be able to take it out to the range. So I did like I do with every other firearm I bring home, I field stripped it and cleaned off all of the factory oil and got it ready to be warmed up and apply Frog Lube to it.

Tear down is very similar to the S&W M&P's, with just one little trick that took me a second to figure out, and that was when you move the slide forward you need to put your thumb on the back and give it just a little more push to get it over the detent for the safety. Which is actually nice if your hand accidentally slips in the process your slide won't jolt forward.
After I finished applying the Frog Lube paste and letting it dry to the point that I could rub off the excess it was ready to go to the range the next day. Having very little time to spend at the range I only took 50 rounds with me so I could get a feel for how the FNS shoots and what I was going to have to do to get used to using the european sighting (actually putting your front sight on what you want to hit).
Along with the FNS I took our M&P9 that has the Apex trigger kit installed so I could compare the two. I also took my wife with since she enjoys shooting and I also like to make sure that she is familiar with every weapon that is in our house.

I must admit that the stock trigger on a brand new FNS9 is a bit more stiff than one that is pre-owned but I know that over time the trigger will wear in and be closer to that of the pre owned one I had messed with at the store. Yet running through a quick session with it I did not feel that the trigger was bad at all, actually it was much better than the stock one that had been in the M&P, the reset is very pronounced and the pull is not super long.
I should also point out that the mags are very slick and drop freely with out any hang ups.
The night sights that are installed on the FNS are very nice quality, and are very easy to use in full light and low light environments. It does take a little getting used to using european sighting but for me I have always had an easier time with that style anyways.

Overall I really like the FNS9 so far, and I am sure as time goes on and I get more range time with it that I will like it even more. I am glad that even though it is a bigger handgun in size that I can still conceal it for everyday carry and it is still comfortable at the end of the day. I plan on giving updates as time goes on and more rounds have been run through it.
Wednesday, December 12, 2012
Upcoming Reviews
Over the next couple of weeks I will be working on reviews for-
My first impressions of the FNH FNS-9
Upgrade work that I had done by Marshall at Argyle Armoring
My Pre-Range use impressions of the Vortex VMX3 Magnifier
The Rainer Raptor Charging Handle
Please check back often as these will be coming very soon.
My first impressions of the FNH FNS-9
Upgrade work that I had done by Marshall at Argyle Armoring
My Pre-Range use impressions of the Vortex VMX3 Magnifier
The Rainer Raptor Charging Handle
Please check back often as these will be coming very soon.
Tuesday, December 11, 2012
The Spartan Build- Lower
The base of the Spartan build begins with the 2 Vets Arms Spartan Lower, the awesome idea for these came about just a couple months ago when they had announced they were going to make these special editition lowers.

The proceeds were going to a very worthy cause so I pre-ordered 3 of them.
While waiting for the release of the lowers I started making a list of the parts that I have liked from the other AR's that I have owned in the past, I also started watching the usual sites for sales and awesome deals. With Black Friday approaching I knew that Palmetto State Armory would be having some great sales, so I kept a very close eye on the parts that I was looking for.
There are a few things that I have never cared for about the complete rifles you see in most gun stores.
First is the mil-spec collapsible stock, it's hard for me to find a good cheek weld with it, and I have never found it to be very comfortable when shouldering. The great thing is there are so many companies out there to choose from. For this build I went with the B5 Systems SOPMOD, it is extremely comfortable and well built.
Second is the trigger that comes in most stock AR-15's, they have always felt gritty and like they have a mile long trigger pull. After having the Geissele SD-E trigger in one of my old builds I will never be able to go back to a stock trigger. I found a smoking deal through PSA for a Geissele SSA-E trigger and the only difference between this and the SD-E is its not a flat face trigger. The reason I really like the Geissele triggers is that the pull is super predictable and the break is crisp and clean.
(This trigger has now been changed to the ALG ACT for our upcoming comparison reviews. [11/14/2013])

As far as the lower parts kit goes I went with the enhanced PSA kit, it comes with the Magpul MOE pistol grip, and the MOE trigger guard.

This is one lower that I am looking anxiously forward to putting together and getting the Spartan Upper mounted to.
Monday, December 10, 2012
Every Day Belts (EDB)
When I first started concealed carrying I had this flimsy old belt, and when I say old I mean I had it for over 10 years, and it really didn't hold up to the weight of an OWB holster. So I began my search for a belt that would work for my every day carry and for work purposes.
The first belt that I picked up was the Blackhawk CQB/Riggers Belt, one of the reasons that I picked it up was the price, at $27 shipped from Amazon.com it was a hard one to pass up. As far as a "starter" belt for EDC or even range use the Blackhawk CQB belt actually fits very well into that category.

Fit- The Blackhawk is extremely adjustable in size compared to some of the other EDC belts that are out on the market right now, I ordered the medium and with a 34" waist there is plenty of room in the adjustment to go to a larger or smaller size.
Finish- While the Blackhawk is on the lower end of the price range compared to other companies out there, it is put together fairly well, the stitching is uniform and not sloppy. The buckle and D-ring are both very sturdy, the buckle adjusts easily and holds steady once you are set to the size you need.


Some things that I have noticed when wearing the Blackhawk, first the buckle does not sit nearly as flat as I would like for it to, it seems to cause an awkward looking "bulge" where it sits. Second the end of the belt when attached to the velcro can sometimes poke up and rub against your side, if you don't have an undershirt on or have your shirt tucked in this can become a bit irritating.
Overall I think that for someone looking for a "budget" riggers belt the Blackhawk CQB/Riggers Belt would fit the bill just fine.
My other belt is the Cobra Riggers Belt from Original S.O.E. this belt was quite a bit more in price but when compared to the Blackhawk belt you can quickly see the reasons. The O.S.O.E belt shows a much higher quality of craftsmanship, the stitching is extremely uniform, and is made of a much higher quality thread than the Blachkhawk. It also has comes with a quick disconnect buckle that makes it much easier for daily use than the pull through tension style of the Blackhawk.

The O.S.O.E. Cobra belt is a much stiffer belt thanks to the velcro backing that is sewn into it. Having the extra stoutness to it makes it much more comfortable when carrying both a gun holster and a magazine pouch. It seems to hold up very well to the added weight, where the Blackhawk belt does not.
Fit- While not as adjustable as the Blackhawk there is still room for you to order it slightly smaller and just let it out a bit if you are not near your ideal weight (like myself), and this in no way hinders the way that the belt feels when you are wearing it.
Finish- Out of the few belts that I have owned I will give OSOE top marks on the quality of the Cobra belt, the stitching is perfect and the quality of the materials is top grade. The buckle is comfortable and extremely functional, allowing adjustments to be made while still maintaining quick disconnect ability.


If you are looking for an every day belt that is on the lower end of the price scale I would not hesitate in suggesting the Blackhawk CQB Belt as it fits the bill, while still giving you a sturdy enough belt to carry your holster. Yet in my own opinion if you are willing to save up the money and wait a little bit longer any of the belts from Original S.O.E. are worth the wait and spending just a little bit more on.

Sunday, December 9, 2012
The Spartan Build- Upper
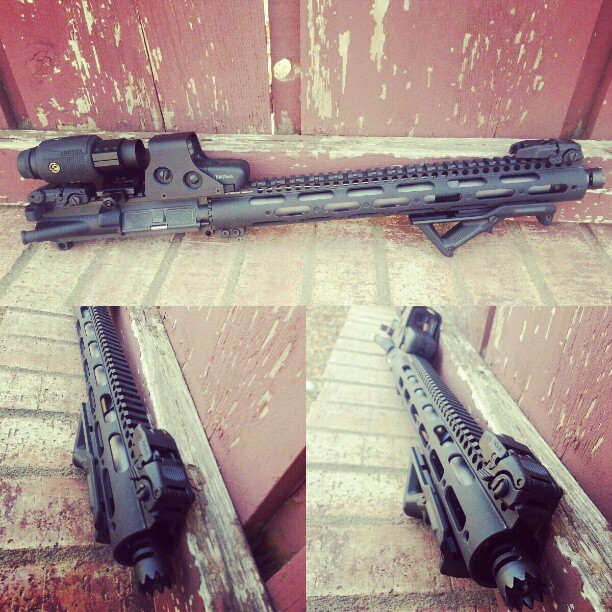
Out of the multiple AR's that I have owned over the past few years every single one has had an upper that had already been assembled before I ordered it. But with all of the searching that I was doing looking for the "right" upper to go on my build I finally decided that I just wasn't finding the upper that screamed "put me on the spartan build!". Now I consider myself to be competent enough to assemble parts to rifles, but I had always been a bit hesitant to build my own upper, mainly because I just had not done it before. So this has been a whole new experience for me, thankfully I have quite a few friends out there who have built their own uppers and they were more than willing to help me out with the list of parts that I would need to do my build.
Upper Receiver- I picked up a Wilson Combat Upper receiver to be the base of my build. One of the biggest reasons was because of the name that Wilson has created for itself in the firearms industry.

Charging Handle- Because I have never really cared for the Mil-Spec Charging Handle I decided that I wanted to find something that was ambidextrous and would make it easier for me to grab even when I am wearing gloves. In stepped the Rainer Arms Raptor, this charging handle is exactly what I have always been looking for when it came to an extended and ambi latch, with a gloved hand or a single finger I can easily get enough contact with the Raptor to be able to unlatch the handle and begin the charging of the rifle.

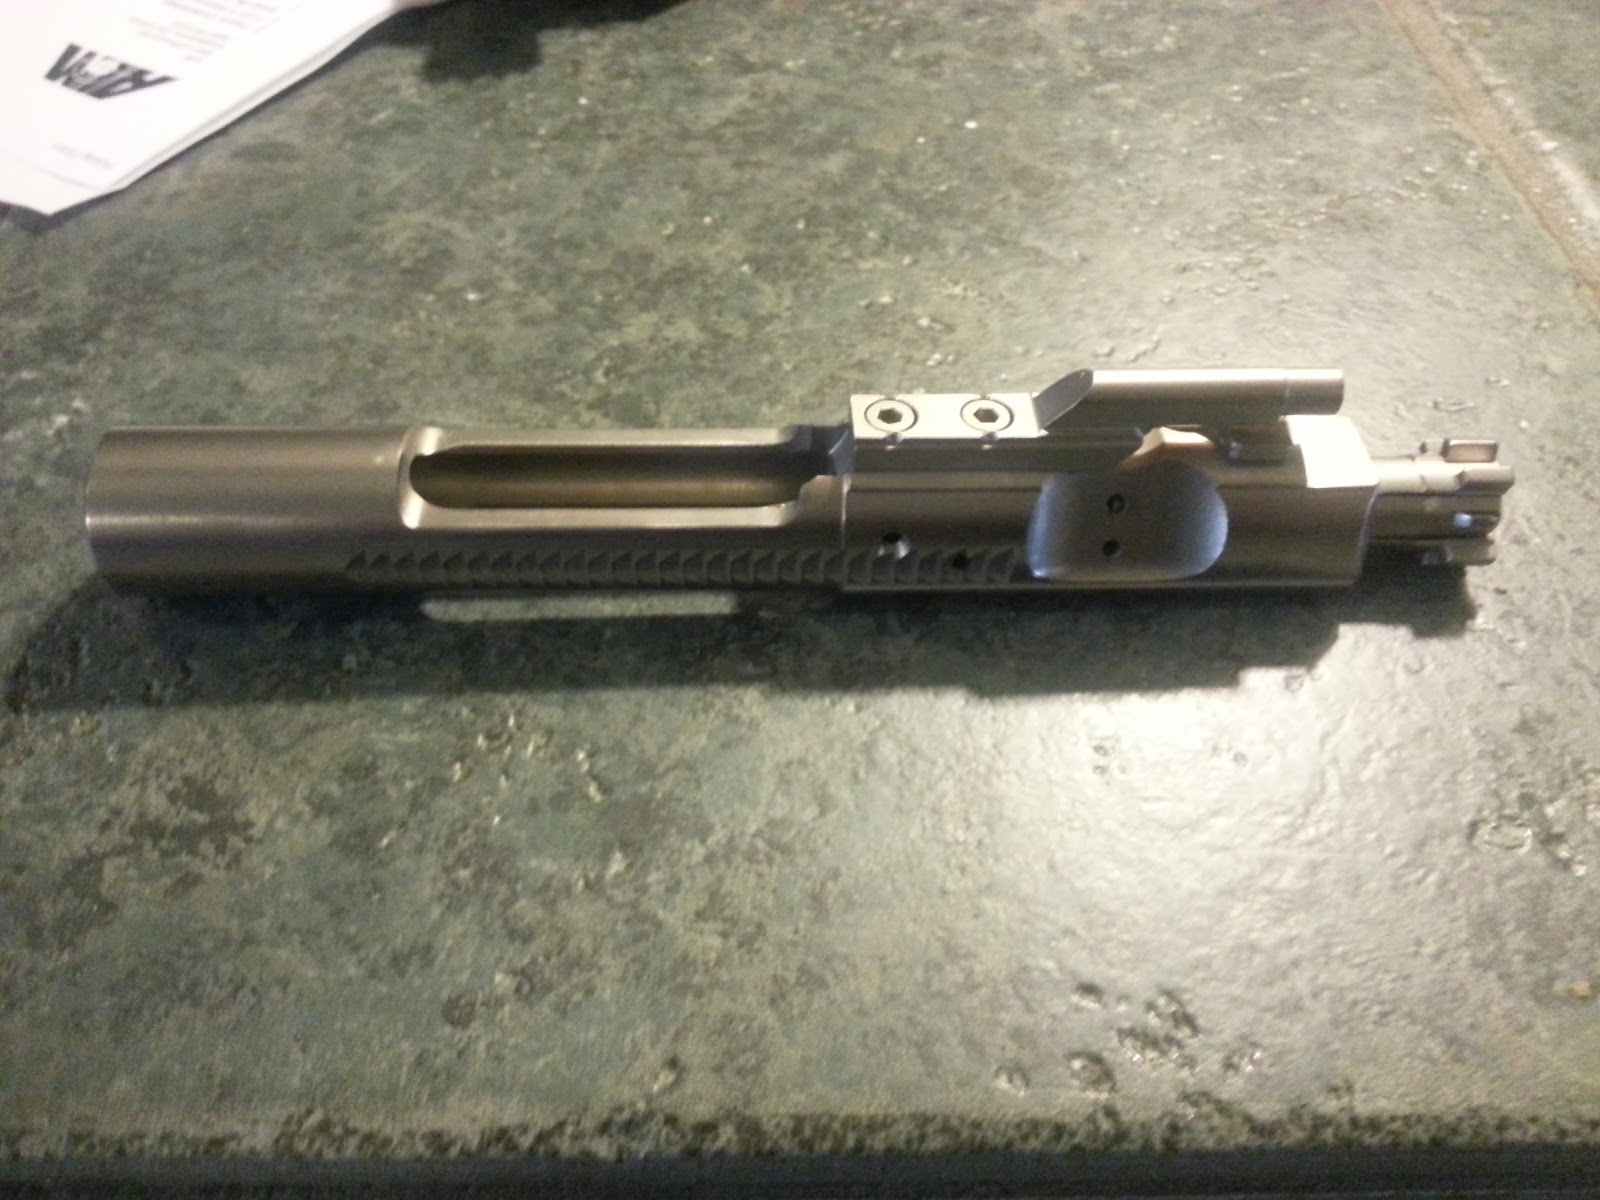
Bolt Carrier Group- I have been a bit fascinated with the concept of the Nickel Boron coating on the Bolt Carrier Groups so when I ran across this deal, I didn't have to think long to toss it into my shopping cart and proceed right on over to checkout. So far I am very impressed by the quality of this BCG from RGuns.

Hand Guard- For this I had to think about all of the things that I have not liked about the other hand guards that have been on the other uppers that I have owned. I wanted something that was lighter weight, but still have the ability to have "mobile" sections of rail to add accessories if and when they may be needed. When I ran across the Midwest Industries 15-inch Gen2 SS-Series One Piece Free Float Hand Guard it fit the bill of what I had been looking for.
Barrel- With the barrel being by far one of the most important parts of the upper build I felt that I didn't need to skimp on it and just grab whatever was available. Knowing the reputation Rainer Arms has I decided that I wanted to look into getting one of their barrels. The Rainier Arms Select 5.56MM Barrel in matte stainless was exactly what I was looking for in a barrel, with the polygonal rifiling, 416r stainless steel, mid length gas system, and a 90 day satisfaction guarantee I decided that this was the barrel for me. I went with the 14.5" barrel so when I added on my muzzle device it would be right at 16".
Muzzle Device- Every other upper that I have had has always had the traditional Bird Cage on them, so this time I decided that I really wanted something that would help keep muzzle rise down while at the same time look gnarly. After reading reviews on several different types I ran across the 556 Tactical Stryker Comp which fit the bill for both the control of muzzle rise, and overall looking gnarly.

Gas Block- Most any low profile gas block will work for every application, but I wanted to have the adjustability that the Kies Adjustable Gas Block offered up, and with as highly as this gas block comes from the reviews I have read I am expecting to see great results from it.
There were the other "small" pieces that are needed to finish a build for the upper, the dust cover, forward assist, gas tube, and the parts needed to install them. These parts can be found on Brownells, or any other company that sells parts for AR's.
Now being that I am using a 14.5" Barrel on this build I had to permanently attach the muzzle device to the barrel to make it legal length. Pinning the comp to the barrel was the method that was used for mine.
I must admit that building the upper from pieces is quite satisfying, and really leaves you with a sense of accomplishment. I have a whole new outlook on building AR's and I am looking forward to building the 2 uppers for the other Spartan lowers that I have. Here is a picture of the upper all assembled and ready to go. There are multiple accessories on it in this picture but I will get into those and the reason I picked them in a later post.

Upper Receiver- I picked up a Wilson Combat Upper receiver to be the base of my build. One of the biggest reasons was because of the name that Wilson has created for itself in the firearms industry.

Charging Handle- Because I have never really cared for the Mil-Spec Charging Handle I decided that I wanted to find something that was ambidextrous and would make it easier for me to grab even when I am wearing gloves. In stepped the Rainer Arms Raptor, this charging handle is exactly what I have always been looking for when it came to an extended and ambi latch, with a gloved hand or a single finger I can easily get enough contact with the Raptor to be able to unlatch the handle and begin the charging of the rifle.

Bolt Carrier Group- I have been a bit fascinated with the concept of the Nickel Boron coating on the Bolt Carrier Groups so when I ran across this deal, I didn't have to think long to toss it into my shopping cart and proceed right on over to checkout. So far I am very impressed by the quality of this BCG from RGuns.
Hand Guard- For this I had to think about all of the things that I have not liked about the other hand guards that have been on the other uppers that I have owned. I wanted something that was lighter weight, but still have the ability to have "mobile" sections of rail to add accessories if and when they may be needed. When I ran across the Midwest Industries 15-inch Gen2 SS-Series One Piece Free Float Hand Guard it fit the bill of what I had been looking for.
Barrel- With the barrel being by far one of the most important parts of the upper build I felt that I didn't need to skimp on it and just grab whatever was available. Knowing the reputation Rainer Arms has I decided that I wanted to look into getting one of their barrels. The Rainier Arms Select 5.56MM Barrel in matte stainless was exactly what I was looking for in a barrel, with the polygonal rifiling, 416r stainless steel, mid length gas system, and a 90 day satisfaction guarantee I decided that this was the barrel for me. I went with the 14.5" barrel so when I added on my muzzle device it would be right at 16".
Muzzle Device- Every other upper that I have had has always had the traditional Bird Cage on them, so this time I decided that I really wanted something that would help keep muzzle rise down while at the same time look gnarly. After reading reviews on several different types I ran across the 556 Tactical Stryker Comp which fit the bill for both the control of muzzle rise, and overall looking gnarly.

Gas Block- Most any low profile gas block will work for every application, but I wanted to have the adjustability that the Kies Adjustable Gas Block offered up, and with as highly as this gas block comes from the reviews I have read I am expecting to see great results from it.
There were the other "small" pieces that are needed to finish a build for the upper, the dust cover, forward assist, gas tube, and the parts needed to install them. These parts can be found on Brownells, or any other company that sells parts for AR's.
Now being that I am using a 14.5" Barrel on this build I had to permanently attach the muzzle device to the barrel to make it legal length. Pinning the comp to the barrel was the method that was used for mine.
I must admit that building the upper from pieces is quite satisfying, and really leaves you with a sense of accomplishment. I have a whole new outlook on building AR's and I am looking forward to building the 2 uppers for the other Spartan lowers that I have. Here is a picture of the upper all assembled and ready to go. There are multiple accessories on it in this picture but I will get into those and the reason I picked them in a later post.
Saturday, December 8, 2012
Rogue Tactical Concealment
I had the awesome pleasure of having a couple holsters made by Steve at Rogue Tactical Concealment, not only was he super fast with his communication back and forth, he was also very quick to respond and help me decide how I would like to have my holster set up. I placed the order 11/29/2012 and I had the holster for my M&P in my hands by 12/7/2012, that is awesome turn around time and the quality did not suffer at all. Although we have a slight fitting issue with the M&P being a little too tight in the holster, Steve is backing his workmanship and will be fixing the fitting issue this up coming week.
Let me give you all my impression of the holsters. The first thing that you notice as soon as you remove them from the shipping box is the quality of the workmanship that is put into them. The edges are all smooth to the touch making for a very comfortable holster. The rivets are nice and tight, with a uniform look to them. The main body of the holster is made from .060 kydex giving it a desired flexibility factor, while the belt loops are made from .093 kydex giving you a very sturdy platform for your holster to sit on.


Wearing the holsters is very comfortable, even though these are made to fit extremely close to the body you don't feel like they are poking you. I noticed when I put on both holsters that even though I am nowhere near my ideal weight right now they stayed very close to my body and did not create a "wider" than normal visual effect.


Holstering and unholstering the magazines is very smooth with just the right amount of tension to make it so they do not just freely fall out while moving. Even though there is a fitment issue right now with my M&P I was able to carry my FNS-9 around today and never felt that the firearm was in any danger of falling out, again the tension was just right, and the holster was comfortable in every situation.
I have owned several different holsters over the past year, and for the cost and quality of these holsters from RTC, I will be doing more business with them. I highly recommend checking them out.
WWW.RogueTacticalConcealment.com
Friday, December 7, 2012
The Spartan Build
A few months ago 2 Vets Arms brought up the idea of releasing a limited edition AR lower where the proceeds would be donated to Descendants of Sparta to assist with the prevention of active military and veteran suicide.
 Of course the idea received lots of support and they moved ahead with their plans to release it for pre order. When 2VA announced that the lowers were up for purchase I quickly jumped on to their site and ordered 3 of them, 2 of which are for myself and the other will be set aside until my son is old enough to build his own.
After placing the order I began thinking about all of the different things I have liked and disliked about the AR builds I have had, and started researching the different parts that are available trying to figure out what I wanted to use for what I have now dubbed "The Spartan Build".
Over the next couple posts I will list all of the different parts that I am using in this build, along with pictures of the build as it progresses.
Thursday, December 6, 2012
Resurrecting This Blog!
Well it is time to resurrect this site and begin doing reviews and writting articles once agin. Over the past few months there have been plenty of firearms that I have owned or shot and I would like to give some input on them, so please stay tuned for more to come.
Thanks!
Thanks!
Subscribe to:
Posts (Atom)